
The fax test failed
If you ran a fax test and the test failed, review the report for basic information about the
error. For more detailed information, check the report to see which part of the test failed,
and then review the appropriate topic in this section for solutions to try.
This section contains the following topics:
•
The "Fax Hardware Test" failed
•
The "Fax Connected to Active Telephone Wall Jack" test failed
•
The "Phone Cord Connected to Correct Port on Fax" test failed
•
The "Using Correct Type of Phone Cord with Fax" test failed
•
The "Dial Tone Detection" test failed
•
The "Fax Line Condition" test failed
The "Fax Hardware Test" failed
Solution:
•
Turn off the device by using the Power button located on the device control panel
and then unplug the power cord from the back of the device. After a few seconds,
plug the power cord in again, and then turn the power on. Run the test again. If
the test fails again, continue reviewing the troubleshooting information in this
section.
•
Try to send or receive a test fax. If you can send or receive a fax successfully,
there might not be a problem.
•
If you are running the test from the Fax Setup Wizard (Windows) or HP Setup
Assitant (Mac OS X), make sure the device is not busy completing another task,
such as receiving a fax or making a copy. Check the display for a message
indicating that the device is busy. If it is busy, wait until it is finished and in the idle
state before running the test.
Solve fax problems
101

•
Make sure you use the phone cord that came with the device. If you do not use
the supplied phone cord to connect from the telephone wall jack to the device,
you might not be able to send or receive faxes. After you plug in the phone cord
that came with the device, run the fax test again.
•
If you are using a phone splitter, this can cause faxing problems. (A splitter is a
two-cord connector that plugs into a telephone wall jack.) Try removing the splitter
and connecting the device directly to the telephone wall jack.
After you resolve any problems found, run the fax test again to make sure it passes
and the device is ready for faxing. If the Fax Hardware Test continues to fail and you
experience problems faxing, contact HP support. Go to
www.hp.com/support
. If
prompted, choose your country/region, and then click Contact HP for information on
calling for technical support.
The "Fax Connected to Active Telephone Wall Jack" test failed
Solution:
•
Check the connection between the telephone wall jack and the device to make
sure the phone cord is secure.
•
Make sure you use the phone cord that came with the device. If you do not use
the supplied phone cord to connect from the telephone wall jack to the device,
you might not be able to send or receive faxes. After you plug in the phone cord
that came with the device, run the fax test again.
•
Make sure you have correctly connected the device to the telephone wall jack.
Using the phone cord supplied in the box with the device, connect one end to your
telephone wall jack, then connect the other end to the port labeled 1-LINE on the
back of the device. For more information on setting up the device for faxing, see
Additional fax setup
.
•
If you are using a phone splitter, this can cause faxing problems. (A splitter is a
two-cord connector that plugs into a telephone wall jack.) Try removing the splitter
and connecting the device directly to the telephone wall jack.
•
Try connecting a working phone and phone cord to the telephone wall jack that
you are using for the device and check for a dial tone. If you do not hear a dial
tone, contact your telephone company and have them check the line.
•
Try to send or receive a test fax. If you can send or receive a fax successfully,
there might not be a problem.
After you resolve any problems found, run the fax test again to make sure it passes
and the device is ready for faxing.
Chapter 7
102
Solve a problem
The "Phone Cord Connected to Correct Port on Fax" test failed
Solution: Plug the phone cord into the correct port.
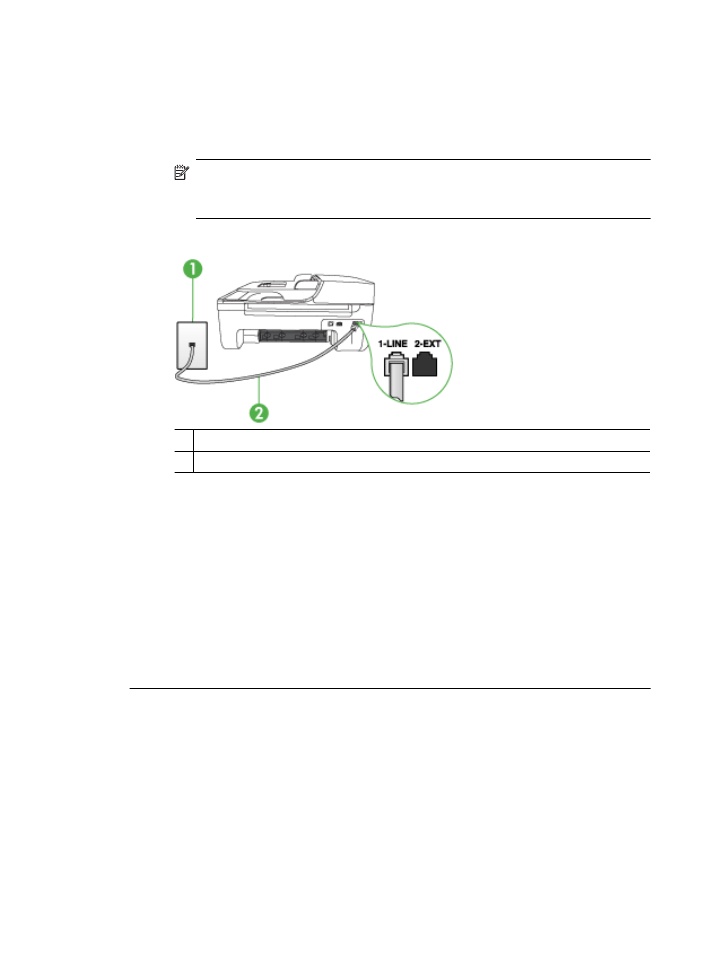
1. Using the phone cord supplied in the box with the device, connect one end to your
telephone wall jack, then connect the other end to the port labeled 1-LINE on the
back of the device.
NOTE: If you use the 2-EXT port to connect to the telephone wall jack, you
will not be able to send or receive faxes. The 2-EXT port should only be used
to connect other equipment, such as an answering machine.
Figure 7-1 Back view of the device
1 Telephone wall jack
2 Use the phone cord supplied in the box with the device to connect to the "1-LINE" port
2. After you have connected the phone cord to the port labeled 1-LINE, run the fax
test again to make sure it passes and the device is ready for faxing.
3. Try to send or receive a test fax.
•
Make sure you use the phone cord that came with the device. If you do not use
the supplied phone cord to connect from the telephone wall jack to the device,
you might not be able to send or receive faxes. After you plug in the phone cord
that came with the device, run the fax test again.
•
If you are using a phone splitter, this can cause faxing problems. (A splitter is a
two-cord connector that plugs into a telephone wall jack.) Try removing the splitter
and connecting the device directly to the telephone wall jack.
The "Using Correct Type of Phone Cord with Fax" test failed
Solution:
•
Make sure you used the phone cord supplied in the box with the device to connect
to the telephone wall jack. One end of the phone cord should be connected to the
Solve fax problems
103
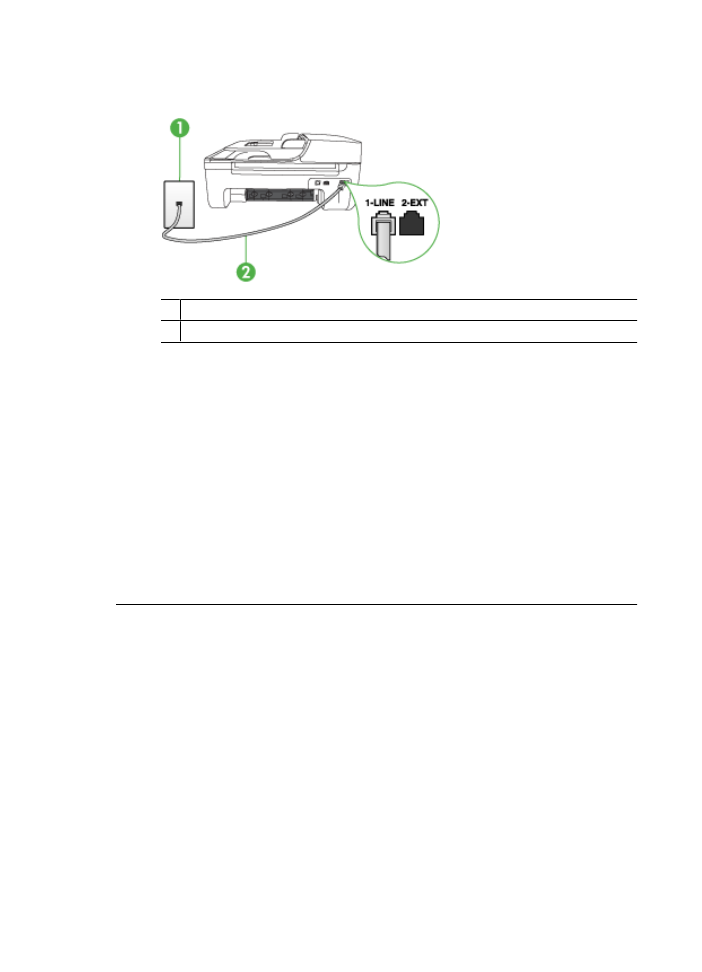
port labeled 1-LINE on the back of the device, and the other end to your telephone
wall jack, as shown below.
1 Telephone wall jack
2 Use the phone cord supplied in the box with the device to connect to the "1-LINE" port
If the phone cord that came with the device is not long enough, you can use a
coupler to extend the length. You can purchase a coupler at an electronics store
that carries phone accessories. You will also need another phone cord, which can
be a standard phone cord that you might already have in your home or office.
•
Check the connection between the telephone wall jack and the device to make
sure the phone cord is secure.
•
Make sure you use the phone cord that came with the device. If you do not use
the supplied phone cord to connect from the telephone wall jack to the device,
you might not be able to send or receive faxes. After you plug in the phone cord
that came with the device, run the fax test again.
•
If you are using a phone splitter, this can cause faxing problems. (A splitter is a
two-cord connector that plugs into a telephone wall jack.) Try removing the splitter
and connecting the device directly to the telephone wall jack.
The "Dial Tone Detection" test failed
Solution:
•
Other equipment, which uses the same phone line as the device, might be causing
the test to fail. To find out if other equipment is causing a problem, disconnect
everything from the phone line, and then run the test again. If the Dial Tone
Detection Test passes without the other equipment, then one or more pieces of
the equipment is causing problems; try adding them back one at a time and
rerunning the test each time, until you identify which piece of equipment is causing
the problem.
•
Try connecting a working phone and phone cord to the telephone wall jack that
you are using for the device and check for a dial tone. If you do not hear a dial
tone, contact your telephone company and have them check the line.
Chapter 7
104
Solve a problem

•
Make sure you have correctly connected the device to the telephone wall jack.
Using the phone cord supplied in the box with the device, connect one end to your
telephone wall jack, then connect the other end to the port labeled 1-LINE on the
back of the device.
•
If you are using a phone splitter, this can cause faxing problems. (A splitter is a
two-cord connector that plugs into a telephone wall jack.) Try removing the splitter
and connecting the device directly to the telephone wall jack.
•
If your telephone system is not using a standard dial tone, such as some PBX
systems, this might cause the test to fail. This will not cause a problem sending
or receiving faxes. Try sending or receiving a test fax.
•
Check to make sure the country/region setting is set appropriately for your
country/region. If the country/region setting is not set or is set incorrectly, the test
might fail and you might have problems sending and receiving faxes.
•
Make sure you connect the device to an analog phone line or you will not be able
to send or receive faxes. To check if your phone line is digital, connect a regular
analog phone to the line and listen for a dial tone. If you do not hear a normal
sounding dial tone, it might be a phone line set up for digital phones. Connect the
device to an analog phone line and try sending or receiving a fax.
•
Make sure you use the phone cord that came with the device. If you do not use
the supplied phone cord to connect from the telephone wall jack to the device,
you might not be able to send or receive faxes. After you plug in the phone cord
that came with the device, run the fax test again.
After you resolve any problems found, run the fax test again to make sure it passes
and the device is ready for faxing. If the Dial Tone Detection test continues to fail,
contact your telephone company and have them check the phone line.
The "Fax Line Condition" test failed
Solution:
•
Make sure you connect the device to an analog phone line or you will not be able
to send or receive faxes. To check if your phone line is digital, connect a regular
analog phone to the line and listen for a dial tone. If you do not hear a normal
sounding dial tone, it might be a phone line set up for digital phones. Connect the
device to an analog phone line and try sending or receiving a fax.
•
Check the connection between the telephone wall jack and the device to make
sure the phone cord is secure.
•
Make sure you have correctly connected the device to the telephone wall jack.
Using the phone cord supplied in the box with the device, connect one end to your
telephone wall jack, then connect the other end to the port labeled 1-LINE on the
back of the device.
Solve fax problems
105

•
Other equipment, which uses the same phone line as the device, might be causing
the test to fail. To find out if other equipment is causing a problem, disconnect
everything from the phone line, and then run the test again.
◦
If the Fax Line Condition Test passes without the other equipment, then one
or more pieces of the equipment is causing problems; try adding them back
one at a time and rerunning the test each time, until you identify which piece
of equipment is causing the problem.
◦
If the Fax Line Condition Test fails without the other equipment, connect the
device to a working phone line and continue reviewing the troubleshooting
information in this section.
•
If you are using a phone splitter, this can cause faxing problems. (A splitter is a
two-cord connector that plugs into a telephone wall jack.) Try removing the splitter
and connecting the device directly to the telephone wall jack.
•
Make sure you use the phone cord that came with the device. If you do not use
the supplied phone cord to connect from the telephone wall jack to the device,
you might not be able to send or receive faxes. After you plug in the phone cord
that came with the device, run the fax test again.
After you resolve any problems found, run the fax test again to make sure it passes
and the device is ready for faxing. If the Fax Line Condition test continues to fail and
you experience problems faxing, contact your telephone company and have them
check the phone line.
The display always shows Phone Off Hook
Solution: You are using the wrong type of phone cord. Make sure you are using
the phone cord that came with the device to connect the device to your phone line. If
the phone cord that came with the device is not long enough, you can use a coupler
to extend the length. You can purchase a coupler at an electronics store that carries
phone accessories. You will also need another phone cord, which can be a standard
phone cord that you might already have in your home or office.
Solution: Other equipment that uses the same phone line as the device might be
in use. Make sure extension phones (phones on the same phone line, but not
connected to the device) or other equipment are not in use or off the hook. For
example, you cannot use the device for faxing if an extension phone is off the hook,
or if you are using a computer dial-up modem to send e-mail or access the Internet.
The device is having problems sending and receiving faxes
Solution: Make sure the device is turned on. Look at the display on the device. If
the display is blank and the Power light is not lit, the device is turned off. Make sure
the power cord is firmly connected to the device and plugged into a power outlet.
Press the Power button to turn on the device.
After turning on the device, HP recommends you wait five minutes before sending or
receiving a fax. The device cannot send or receive faxes while it is initializing after
being turned on.
Chapter 7
106
Solve a problem

Solution: If Fax to PC or Fax to Mac has been enabled, you may not be able to
send or receive faxes if the fax memory is full (limited by device memory).
Solution:
•
Make sure you used the phone cord supplied in the box with the device to connect
to the telephone wall jack. One end of the phone cord should be connected to the
port labeled 1-LINE on the back of the device and the other end to your telephone
wall jack, as shown below.
1 Telephone wall jack
2 Use the phone cord supplied in the box with the device to connect to the "1-LINE" port
If the phone cord that came with the device is not long enough, you can use a
coupler to extend the length. You can purchase a coupler at an electronics store
that carries phone accessories. You will also need another phone cord, which can
be a standard phone cord that you might already have in your home or office.
•
Try connecting a working phone and phone cord to the telephone wall jack that
you are using for the device and check for a dial tone. If you do not hear a dial
tone, call your local telephone company for service.
•
Other equipment, which uses the same phone line as the device, might be in use.
For example, you cannot use the device for faxing if an extension phone is off the
hook, or if you are using a computer dial-up modem to send an e-mail or access
the Internet.
•
Check to see if another process has caused an error. Check the display or your
computer for an error message providing information about the problem and how
to solve it. If there is an error, the device will not send or receive a fax until the
error condition is resolved.
•
The phone line connection might be noisy. Phone lines with poor sound quality
(noise) can cause faxing problems. Check the sound quality of the phone line by
plugging a phone into the telephone wall jack and listening for static or other noise.
If you hear noise, turn Error Correction Mode (ECM) off and try faxing again.
For information about changing ECM, see the onscreen Help. If the problem
persists, contact your telephone company.
•
If you are using a digital subscriber line (DSL) service, make sure that you have
a DSL filter connected or you will not be able to fax successfully. For more
information, see
Case B: Set up the device with DSL
.
Solve fax problems
107
•
Make sure the device is not connected to a telephone wall jack that is set up for
digital phones. To check if your phone line is digital, connect a regular analog
phone to the line and listen for a dial tone. If you do not hear a normal sounding
dial tone, it might be a phone line set up for digital phones.
•
If you are using either a private branch exchange (PBX) or an integrated services
digital network (ISDN) converter/terminal adapter, make sure the device is
connected to the correct port and the terminal adapter is set to the correct switch
type for your country/region, if possible. For more information, see
Case C: Set
up the device with a PBX phone system or an ISDN line
.
•
If the device shares the same phone line with a DSL service, the DSL modem
might not be properly grounded. If the DSL modem is not properly grounded, it
can create noise on the phone line. Phone lines with poor sound quality (noise)
can cause faxing problems. You can check the sound quality of the phone line by
plugging a phone into the telephone wall jack and listening for static or other noise.
If you hear noise, turn off your DSL modem and completely remove power for at
least 15 minutes. Turn the DSL modem back on and listen to the dial tone again.
NOTE: You might notice static on the phone line again in the future. If the
device stops sending and receiving faxes, repeat this process.
If the phone line is still noisy, contact your telephone company. For information
on turning your DSL modem off, contact your DSL provider for support.
•
If you are using a phone splitter, this can cause faxing problems. (A splitter is a
two-cord connector that plugs into a telephone wall jack.) Try removing the splitter
and connecting the device directly to the telephone wall jack.
The device is having problems sending a manual fax
Solution:
NOTE: This possible solution applies only in the countries/regions that receive
a 2-wire phone cord in the box with the device, including: Argentina, Australia,
Brazil, Canada, Chile, China, Colombia, Greece, India, Indonesia, Ireland, Japan,
Korea, Latin America, Malaysia, Mexico, Philippines, Poland, Portugal, Russia,
Saudi Arabia, Singapore, Spain, Taiwan, Thailand, USA, Venezuela, and
Vietnam.
Chapter 7
108
Solve a problem
•
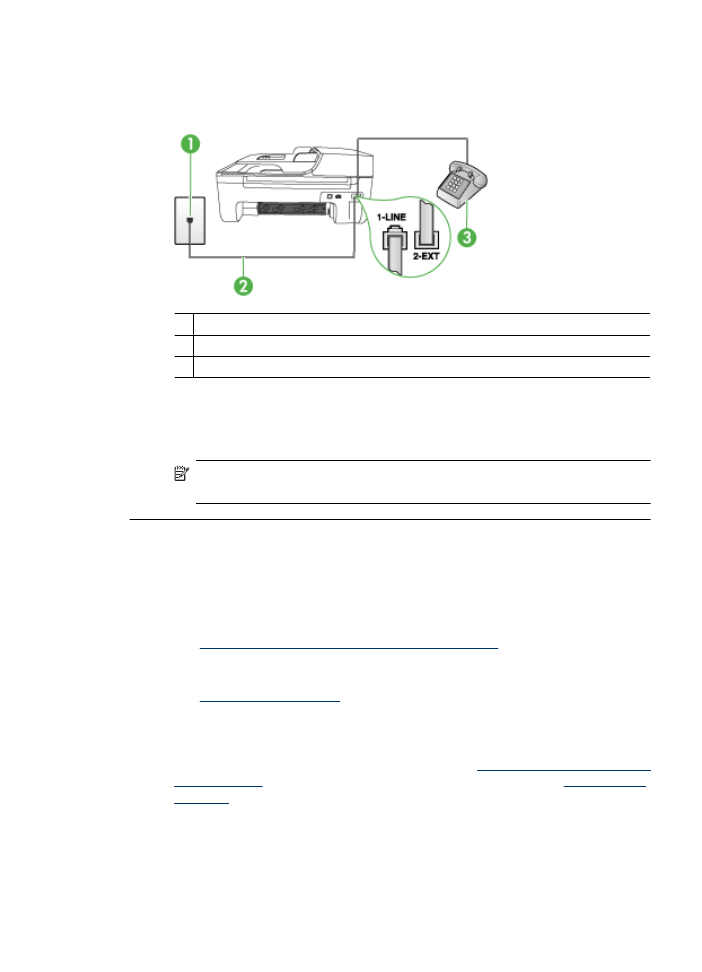
Make sure the telephone you use to initiate the fax call is connected directly to
the device. To send a fax manually, the telephone must be connected directly to
the port labeled 2-EXT on the device, as shown below.
1 Telephone wall jack
2 Use the phone cord supplied in the box with the device to connect to the "1-LINE" port
3 Telephone
•
If you are sending a fax manually from your phone that is connected directly to
the device, you must use the keypad on the telephone to send the fax. You cannot
use the keypad on the device control panel of the device.
NOTE: If using a serial-type phone system, please connect your phone
directly on top of the device cable which has a wall plug attached to it.
The device cannot receive faxes, but can send faxes
Solution:
•
If you are not using a distinctive ring service, check to make sure that the
Distinctive Ring feature on the device is set to All Rings. For more information,
see
Change the answer ring pattern for distinctive ring
.
•
If Auto Answer is set to Off, you will need to receive faxes manually; otherwise,
the device will not receive the fax. For information on receiving faxes manually,
see
Receive a fax manually
.
•
If you have a voice mail service at the same phone number you use for fax calls,
you must receive faxes manually, not automatically. This means that you must be
available to respond in person to incoming fax calls. For information on setting up
the device when you have a voice mail service, see
Case F: Shared voice/fax line
with voice mail
. For information on receiving faxes manually, see
Receive a fax
manually
.
•
If you have a computer dial-up modem on the same phone line with the device,
check to make sure that the software that came with your modem is not set to
receive faxes automatically. Modems that are set up to receive faxes
automatically take over the phone line to receive all incoming faxes, which
prevents the device from receiving fax calls.
Solve fax problems
109

•
If you have an answering machine on the same phone line with the device, you
might have one of the following problems:
◦
Your answering machine might not be set up properly with the device.
◦
Your outgoing message might be too long or too loud to allow the device to
detect fax tones, and the sending fax machine might disconnect.
◦
Your answering machine might not have enough quiet time after your outgoing
message to allow the device to detect fax tones. This problem is most
common with digital answering machines.
The following actions might help solve these problems:
◦
When you have an answering machine on the same phone line you use for
fax calls, try connecting the answering machine directly to the device as
described in
Case I: Shared voice/fax line with answering machine
.
◦
Make sure the device is set to receive faxes automatically. For information on
setting up the device to receive faxes automatically, see
Receive a fax
.
◦
Make sure the Rings to Answer setting is set to a greater number of rings
than the answering machine. For more information, see
Set the number of
rings before answering
.
◦
Disconnect the answering machine and then try receiving a fax. If faxing is
successful without the answering machine, the answering machine might be
causing the problem.
◦
Reconnect the answering machine and record your outgoing message again.
Record a message that is approximately 10 seconds in duration. Speak slowly
and at a low volume when recording your message. Leave at least 5 seconds
of silence at the end of the voice message. There should be no background
noise when recording this silent time. Try to receive a fax again.
NOTE: Some digital answering machines might not retain the recorded
silence at the end of your outgoing message. Play back your outgoing
message to check.
•
If the device shares the same phone line with other types of phone equipment,
such as an answering machine, a computer dial-up modem, or a multi-port switch
box, the fax signal level might be reduced. The signal level can also be reduced
if you use a splitter or connect extra cables to extend the length of your phone. A
reduced fax signal can cause problems during fax reception.
To find out if other equipment is causing a problem, disconnect everything except
the device from the phone line, and then try to receive a fax. If you can receive
faxes successfully without the other equipment, one or more pieces of the other
equipment is causing problems; try adding them back one at a time and receiving
a fax each time, until you identify which equipment is causing the problem.
•
If you have a special ring pattern for your fax phone number (using a distinctive
ring service through your telephone company), make sure that the Distinctive
Ring feature on the device is set to match. For more information, see
Change the
answer ring pattern for distinctive ring
.
Chapter 7
110
Solve a problem

The device cannot send faxes, but can receive faxes
Solution:
•
The device might be dialing too fast or too soon. You might need to insert some
pauses in the number sequence. For example, if you need to access an outside
line before dialing the phone number, insert a pause following the access number.
If your number is 95555555, and 9 accesses an outside line, you might insert
pauses as follows: 9-555-5555. To enter a pause in the fax number you are typing,
press Redial/Pause, or press the Space (#) button repeatedly, until a dash (-)
appears on the display.
You can also send the fax using monitor dialing. This enables you to listen to the
phone line as you dial. You can set the pace of your dialing and respond to
prompts as you dial. For more information, see
Send a fax using monitor
dialing
.
•
The number you entered when sending the fax is not in the proper format or the
receiving fax machine is having problems. To check this, try calling the fax number
from a telephone and listen for fax tones. If you cannot hear fax tones, the
receiving fax machine might not be turned on or connected, or a voice mail service
could be interfering with the recipient's phone line. You can also ask the recipient
to check the receiving fax machine for any problems.
Fax tones are recorded on my answering machine
Solution:
•
When you have an answering machine on the same phone line you use for fax
calls, try connecting the answering machine directly to the device as described in
Case I: Shared voice/fax line with answering machine
. If you do not connect the
answering machine as recommended, fax tones might be recorded on your
answering machine.
•
Make sure the device is set to receive faxes automatically and that the Rings to
Answer setting is correct. The number of rings to answer for the device should
be greater than the number of rings to answer for the answering machine. If the
answering machine and the device are set to the same number of rings to answer,
both devices answer the call and fax tones are recorded on the answering
machine.
•
Set your answering machine to a low number of rings and the device to answer
in the maximum number of rings supported. (The maximum number of rings varies
by country/region.) In this setup, the answering machine answers the call and the
device monitors the line. If the device detects fax tones, the device receives the
fax. If the call is a voice call, the answering machine records the incoming
message. For more information, see
Set the number of rings before answering
.
The phone cord that came with my device is not long enough
Solution: If the phone cord that came with the device is not long enough, you can
use a coupler to extend the length. You can purchase a coupler at an electronics store
that carries phone accessories. You will also need another phone cord, which can be
a standard phone cord that you might already have in your home or office.
Solve fax problems
111

TIP: If the device came with a 2-wire phone cord adaptor, you can use it with a
4-wire phone cord to extend the length. For information on using the 2-wire phone
cord adaptor, see the documentation that came with it.
To extend your phone cord
1. Using the phone cord supplied in the box with the device, connect one end to the
coupler, then connect the other end to the port labeled 1-LINE on the back of the
device.
2. Connect another phone cord to the open port on the coupler and to the telephone
wall jack.
Color faxes do not print
Cause: The Incoming Fax Printing option is turned off.
Solution: To print color faxes, make sure that the Incoming Fax Printing option in
the device control panel is turned on.
The computer cannot receive faxes (Fax to PC and Fax to Mac)
Cause: The HP Digital Imaging monitor is turned off (Windows).
Solution: Check the taskbar and ensure that the HP Digital Imaging monitor is
turned on at all times.
Cause: The computer selected to receive faxes is turned off.
Solution: Make sure the computer selected to receive faxes is switched on at all
times.
Cause: Different computers are configured for setup and receiving faxes and one
of them may be switched off.
Solution: If the computer receiving faxes is different from the one used for setup,
both computers should be switched on at all times.
Cause: Fax to PC or Fax to Mac is not activated or the computer is not configured
to receive faxes.
Solution: Activate Fax to PC or Fax to Mac and make sure the computer is
configured to receive faxes.
Cause: HP Digital Imaging Monitor is not operating properly (Windows).
Solution: Restart the HP Digital Imaging Monitor or restart the computer.
Chapter 7
112
Solve a problem

Solve wired (Ethernet) network problems (some models
only)
If you are unable to connect the product to your wired (Ethernet) network, perform one
or more of the following tasks.
NOTE: After correcting any of the following, run the installation program again.
•
General network troubleshooting
•
Network port created does not match device IP address (Windows)
General network troubleshooting
If you are unable to install the device software, verify that:
•
All cable connections to the computer and the device are secure.
•
The network is operational and the network hub is turned on.
•
All applications, including virus protection programs, spyware protection programs,
and firewalls, are closed or disabled for computers running Windows
•
The device is installed on the same subnet as the computers that will be using the
device.
If the installation program cannot discover the device, print the network configuration
page, and enter the IP address manually in the installation program. For more information,
see
Understand the network configuration page (some models only)
.
Though it is not recommended that you assign the device with a static IP address, you
might resolve some installation problems (such as a conflict with a personal firewall) by
doing so.
Network port created does not match device IP address (Windows)
If you are using a computer running Windows, make sure that the network ports created
in the device driver match the device IP address:
1. Print the device’s network configuration page
2. Click Start, point to Settings, and then click Printers or Printers and Faxes.
- or -
Click Start, click Control Panel, and then double-click Printers.
3. Right-click the device icon, click Properties, and then click the Ports tab.
4. Select the TCP/IP port for the device, and then click Configure Port.
5. Compare the IP address listed in the dialog box and make sure it matches the IP
address listed on the network configuration page. If the IP addresses are different,
change the IP address in the dialog box to match the address on the network
configuration page.
6. Click OK twice to save the settings and close the dialog boxes.